
One of the biggest challenges in DIVE or DIE – Children of Rain is simply figuring out where everything is. The game doesn’t hand you a map with every resource marked, and it’s easy to spend several in-game days searching for a material that’s hiding in a completely different region.
After exploring every major area and comparing resource locations, this guide brings everything together in one place. Whether you’re hunting for Gold, Lithium, Rain Pearls, or trying to understand how the Blessed versions of areas work, you’ll find everything you need below.
Note: This guide contains map spoilers for late-game areas.
DIVE or DIE – Children of Rain Map Guide (All Areas, Resources & Important Locations)
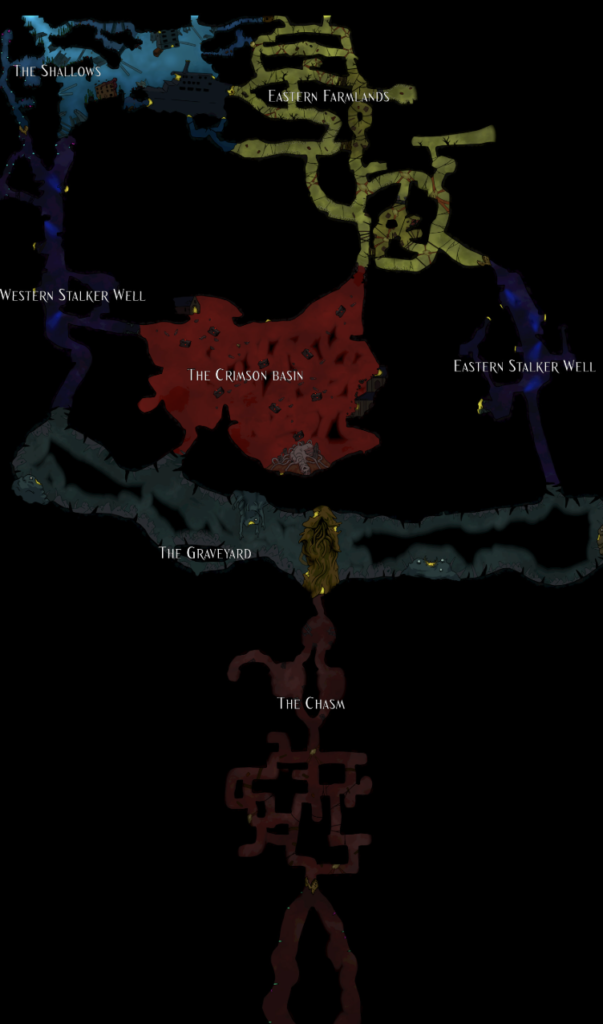
How the World Map Works
The world is divided into several major regions, each offering different enemies, resources, and secrets. Some locations become much more dangerous later in the game, but they’ll also reward you with stronger materials.
An important mechanic to remember is that four regions can become “Blessed.”
When an area enters its Blessed state:
- Enemies become significantly stronger.
- Many resources collected there become Blessed versions, which are required for higher-level crafting.
- Exploring becomes more dangerous, but the rewards are considerably better.
If you’re planning upgrades for late-game equipment, you’ll eventually want to revisit these Blessed areas.
1. The Shallow
This is the first major region and one you’ll likely revisit throughout your adventure.
Resources Found
- Iron
- Coal
- Copper
- Wood Planks
- Seaweed Tissue
- Black Rain Decay
- Silicon
- Leech Glands
Exploration Tips
Wood is easiest to gather beneath the house with the statues. If you’re short on planks, don’t ignore the benches scattered around the area—they provide a surprisingly generous amount of wood when destroyed.
Silicon can be a little frustrating because it only appears near Exit 2. There are three possible spawn locations, although most playthroughs seem to generate only one or two of them.
If you’re farming Leech Glands, head inside the shipwreck. The best time to collect them is after the Red Moon event has ended, since enemy density becomes much more manageable.
2. Eastern Farmland
This region introduces several organic crafting materials you’ll need later in the game.
Resources Found
- Spiderweb Coral
- Poisonous Buds
- Insect-like Blood
- Rain Pearls
Rain Pearl Farming
Rain Pearls deserve special attention because they’re incredibly valuable.
These items allow you to reset your character’s stats, making them perfect if you want to experiment with different builds without starting over.
They’re also quite limited. During multiple explorations, players generally don’t find duplicate Rain Pearls, so it’s best to save them until you’re certain you need a respec.
3. Stalker Well
The Stalker Well is split into two different sections, each offering completely different resources.
West Stalker Well Resources
- Plastic
- Lithium
- Aluminum
This side is the better choice if you’re looking for crafting materials used in advanced equipment.
East Stalker Well Resources
- Gold
- Blood Crystals
- Living Wood
Although valuable, these materials appear in relatively small quantities compared to other regions.
If you’re specifically farming Gold or Blood Crystals, there are better locations later in the game.
4. Crimson Basin
The Crimson Basin is one of the most rewarding locations once you can survive its dangers.
Resources Found
- Gold
- Blood Crystals
- Living Wood
Compared to the eastern portion of the Stalker Well, this area provides a much better opportunity for collecting these valuable materials.
If you’re preparing high-tier equipment, you’ll probably end up making several trips here.
Important Idol Location
One correction discovered by the community is worth mentioning.
The Cathedral Idol inside the Crimson Basin is actually the Fourth Idol, not the third as some early guides suggested.
5. Graveyard
Despite its gloomy appearance, the Graveyard contains materials that become increasingly important later in the game.
Resources Found
- Rain Essence
- Black Rain Scales
These resources are commonly used for higher-tier crafting recipes and upgrades.
6. The Chasm
The Chasm doesn’t introduce an entirely new resource pool.
Instead, it reuses resource themes from the previous four major regions.
Depending on what section you’re exploring, you’ll encounter materials similar to:
- The Shallow
- Eastern Farmland
- Stalker Well
- Crimson Basin
Think of it as a more dangerous remix of earlier zones rather than a completely unique biome.
7. Endrain Village
Unlike most other locations, Endrain Village isn’t a farming area.
Resources Found
None.
Instead, this area primarily serves story progression and NPC interactions rather than resource gathering.
Special Events
Certain events introduce exclusive rewards that can’t normally be obtained during standard exploration.
Crystal Rain (Post-Blessing Region)
After unlocking the post-Blessing version of the world, you’ll encounter Crystal Rain, which changes exploration and provides access to new opportunities.
Black Moon Event
The Black Moon event contains exclusive treasure chests that can reward:
- Black Tears
- Black Orbs
- Black Flowers
- Black Series Upgrade Blueprints
If you’re aiming for complete progression, these event-exclusive rewards are worth prioritising whenever they become available.
Idol Location Correction
One important community discovery corrected an early misconception regarding the idol order.
The correct sequence is:
- Third Idol: Located beneath the West Stalker Well in a hidden room.
- Fourth Idol: Located inside the Cathedral in the Crimson Basin.
If you’re trying to collect every idol, keeping this order in mind can save you quite a bit of unnecessary backtracking.
The world of DIVE or DIE – Children of Rain rewards exploration more than almost anything else. While it’s tempting to rush toward the next objective, taking time to revisit earlier regions often pays off with crafting materials you didn’t realise you’d need later.
If you’re collecting every resource, completing upgrades, or hunting down all the idols, keeping this map nearby can save a lot of wandering—and probably a few unnecessary deaths along the way. As the community uncovers more hidden secrets and optimises farming routes, this map remains one of the most useful references for navigating the game’s haunting world.