
In Annihilated, your choices through the Hero, Warrior, Mage, and Priest routes influence which endings you can achieve. This journey is packed with unique twists, and navigating the endings can be quite the challenge. To avoid confusion while tracking your progress, keeping tabs on important save points and conditions for obtaining the elusive secret Priest ending is essential.
Players will encounter a total of 22 endings, though only 21 are obtainable in standard gameplay. The way each decision impacts your pathways leads to some surprising outcomes and memorable moments. You’ll want to familiarize yourself with the choices laid out for each character to make the most of your playthrough.
Before diving into the routes, be sure to keep an eye on where you save your progress. This will help you avoid unnecessary backtracking and ensure you can explore different endings without losing track.
All Endings & Routes Guide
The game data reveals a wealth of choices, leading to 21 possible unique endings. I’ve sorted them by route to help keep everything clear, ensuring decisions in each scenario remain organized. Following the choices indicated in the images is crucial to maximize your experience without blending paths that could complicate unlocking specific endings.
Gameplay Tips
Annihilated employs two primary attack mechanics: Resolve and Will for manually-timed attacks and Choice and Destiny where attacks depend on your chance to hit—like a 60% success rate. Understanding this distinction enhances combat efficiency.
Additionally, enemies possess a Break Gauge. When it’s reduced to zero, an orange timing bar appears, allowing for a timed hit that can seize their weapon. Defeating ordinary foes is straightforward, but elites and bosses enter a CHANCE state when you time it right, rendering them vulnerable for a turn and doubling damage taken during that period.
I often utilize the protagonist’s Dreak for breaking items—this only works when I’m carrying a limited number of items, dictated by the DEX stat. Another useful technique is Item Break, which switches a weapon from ‘Normal Use’ to ‘Break After Next Use’, allowing for strategic use and extra damage potential. If the timing bar shows up, it signals a weapon seize opportunity, though some weapons lack this feature.
Weapon enhancements can be made through Grey, Yellow, and Purple tiers, with Purple being the highest. Enhancements typically require a campfire and curse, the currency acquired through weapon breaks or defeating bosses, adding a roguelike aspect to the game.
When a run wraps up, you resume from a route checkpoint along with any accrued curse. At this point, feel free to redistribute stats or craft cursed weapons using the memories you’ve gathered. Securing a weapon unlocks its memory within the crafting menu, enabling further modifications.
Hero Route – 3 Endings

The choices for the Hero route are displayed in the image above. Story spoiler: The true identity of the Hero is revealed as a slime. After the original hero’s self-infliction with the Hero’s Sword, a blue slime assumed control of the body.
Where I save: Part 3, right before the boss encounter.
Ending 1: Hero
To achieve this ending, ensure you land the final kick at the end of the boss fight. If you miss, the fight restarts, but a game over still registers and increases the hidden loop count.
Ending 2: Dropout
Ending 3: Distrust
How Distrust Works in the Hero Route
The Hero route maintains a hidden distrust value that influences dialogue choices in part 3. Unavailable options appear greyed out, and toggling this value requires attention to earlier decisions.
| Distrust | Choices available in part 3 |
|---|---|
| 1 or less | “I will save the world with the Hero.” or “I want to save the world with you.” The red choice is unavailable. |
| 2 to 4 | All three choices. |
| 5 or more | “I want to save the world with you.” or the red “I trust neither of you.” The Hero choice is unavailable. |
Two earlier decisions impact the distrust value:
| When | Distrust -1 | Distrust +1 |
|---|---|---|
| Part 1, after the Outcast fight | “Trust the Hero” | “Don’t trust the Hero” |
| Part 2, after the Villainess fight | “The Hero must be in pain” | “The Hero is a monster” |
Choosing responses that show uncertainty adds 0 distrust. Also, maintaining sanity above 40 before the part 3 boss fight is crucial; lower sanity results in increased distrust.
Warrior Route – 7 Endings, 6 Obtainable
The image above highlights the Warrior route choices. Story spoiler: The Warrior is the former fiancé of the Villainess; they grew up together until he cursed her due to a predicted dual demise. He now enjoys his new doll-like form, aspiring to be an idol.
Where I save: Part 1 after the Outcast fight, part 2 after the Villainess fight, and during the major choice in part 5.
Sanity: Sanity isn’t a factor in determining the Warrior route’s endings but may influence certain dialogues.
Ending 1: Idol
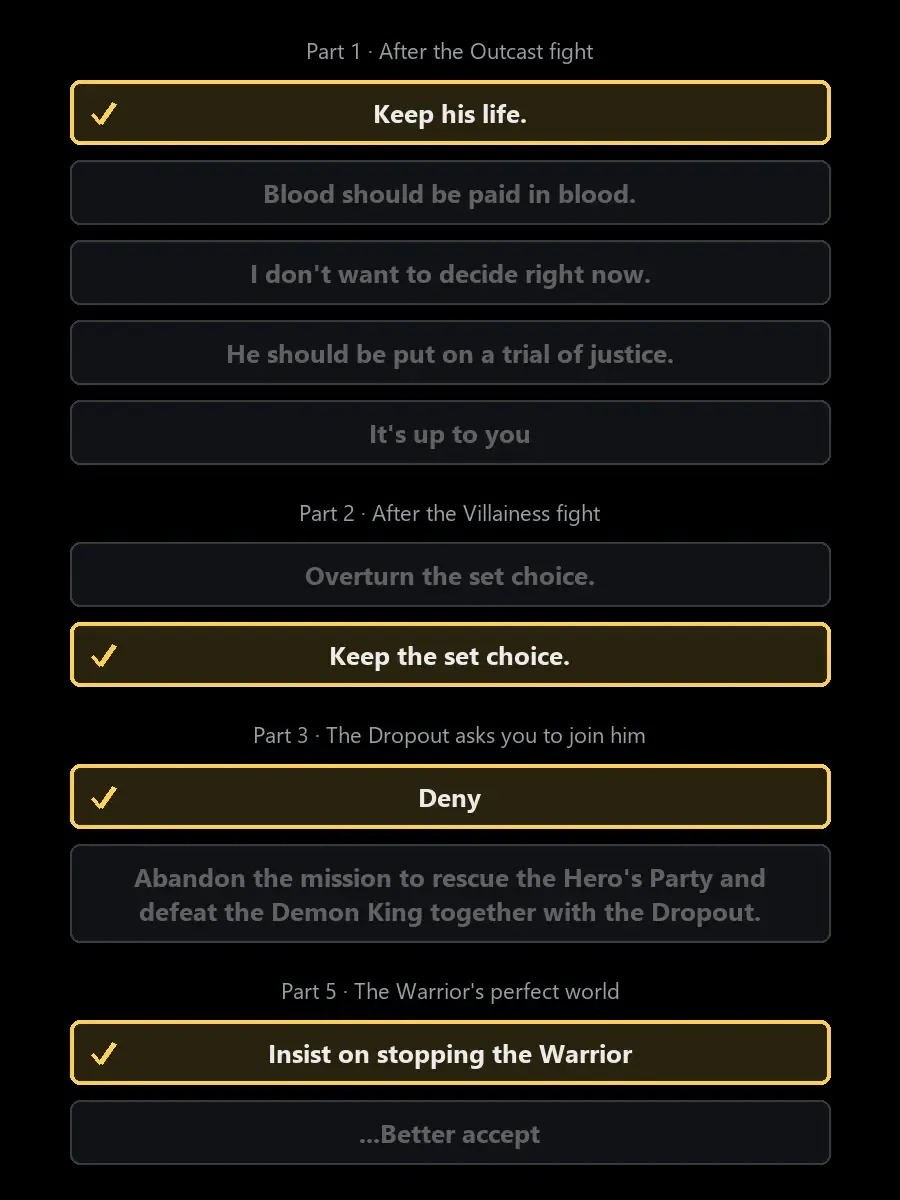
Ending 2: Miniature Garden
Ending 3: Burden
Ending 4: Glitched World
After this ending, the game loops back to the same decision purposefully, allowing progression towards Ending 5.
Ending 5: Glitched Idol
If I selected “Blood should be paid in blood.” during part 1, it reroutes me to the Burden ending (Ending 3) instead.
Ending 6: Dropout
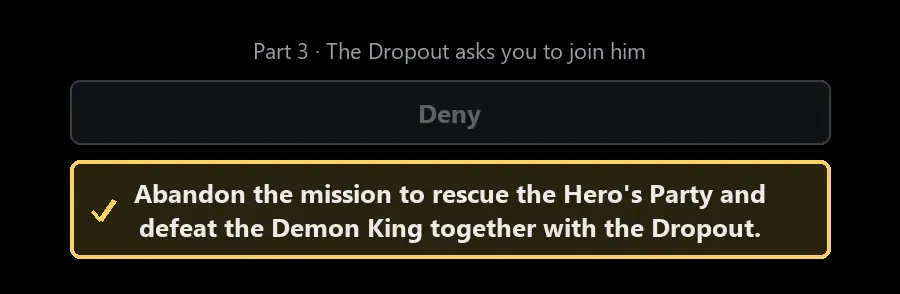
Ending 7: Glitched Miniature Garden (Unobtainable)
This ending is noted in the game’s data yet is unreachable in typical playthroughs. To see it, both the Miniature Garden epilogue (Ending 2) and the Glitch (Ending 4) must occur during the same run, but a glitch will skip the Miniature Garden epilogue.
Loop count note: The duels near the conclusion require retries rather than immediate failures. Additionally, a scripted game over may occur, resulting in increased loop counts, which matters for unlocking the secret ending.
Mage Route – 5 Endings
The Mage route is particularly captivating. Story spoiler: The Mage is an elf outcast from her village, where the Dropout, her rival, pursued and ultimately overshadowed her at magic school, culminating in a theft of her magic.
Where I save: Right after defeating the Dropout in part 3, as this choice determines the onward path.
Sanity: The sanity levels for both the player and the Mage influence dialogue, but not the endings. Warning for Part 1: The red responses “So be it, let’s head back” and “Understood.” lead back to the title screen.
Ending 1: Magic
This ending qualifies as a Mage route clear, so I typically avoid it until the secret Low Loop ending is unlocked.
Ending 2: Unspoken
Ending 3: Love
Ending 4: Friendship
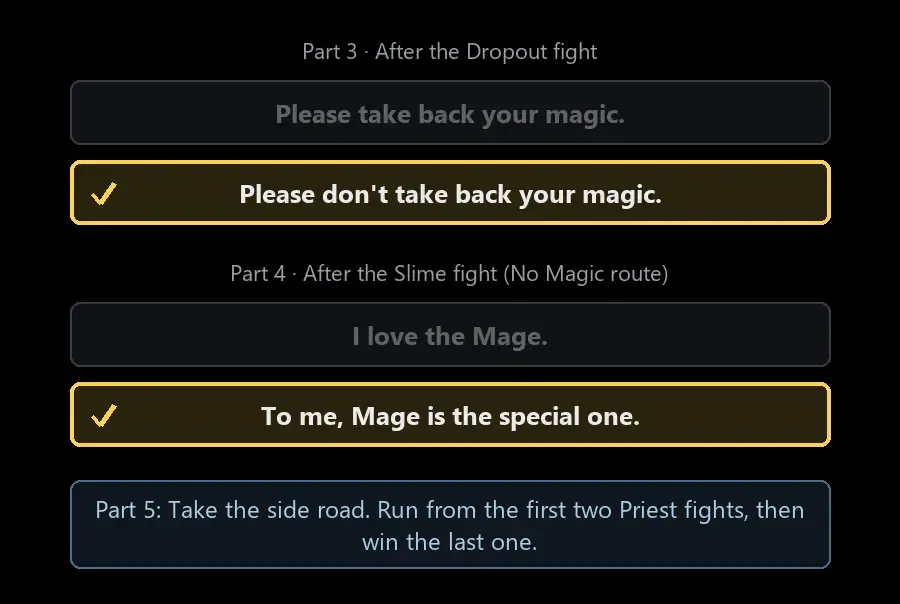
Ending 5: Sheer Guts
Each time I retry after dying in this confrontation, the opponent weakens. I reserve this ending until the secret ending completion.
Priest Route – 7 Endings
Story spoiler: The Priest retains his faith, addressing the elusive “great god” as the player themselves, whose name remains shadowed within the game. He describes his role as a reincarnator, being the childhood friend of the protagonist from their village but intentionally omitted reuniting in this loop.
How I unlock the Priest: Dying in part 1 or 2 of any route leads him to my body, with either response unlocking him. Selecting “Alright” transports me back to the partner selection menu, setting him as my partner.
Where I save: At the hand scene in part 3, after the Slime fight in part 4, and at the final question in part 5.
Ending 1: Dropout
Ending 2: Abandoned
Post this ending, the game forward me automatically to the hand scene, from where I can proceed to reach Ending 3.
Ending 3: Dark Slow Life
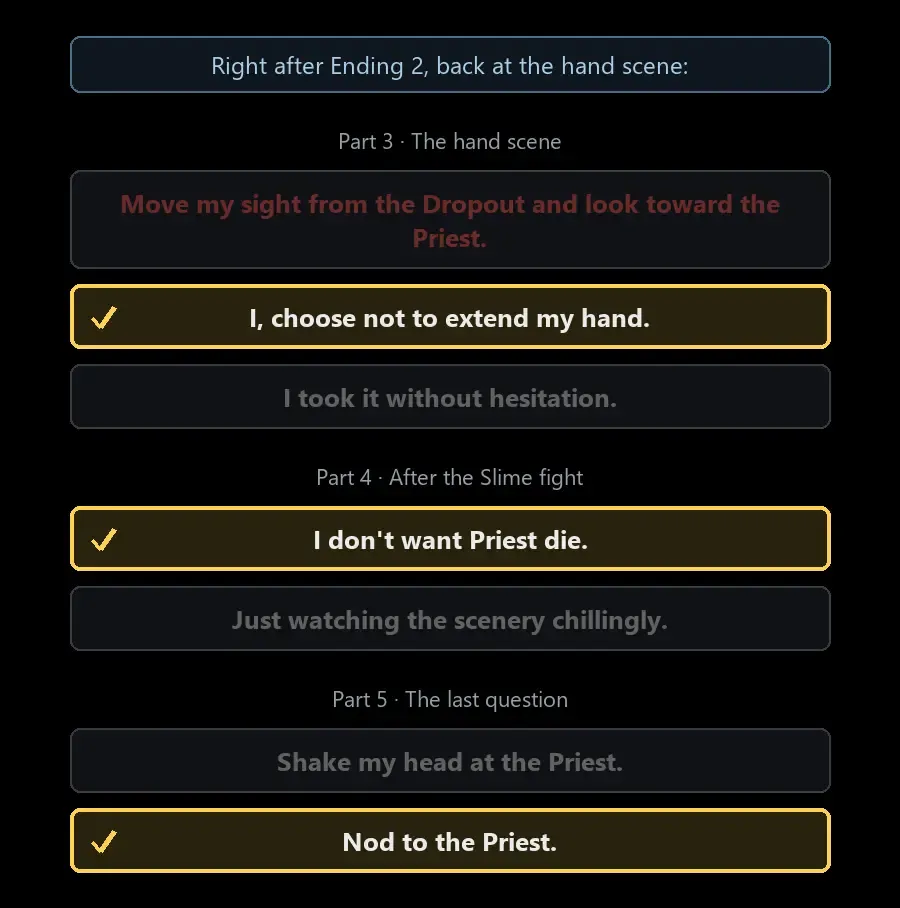
Ending 4: Left Alone
Ending 4: Left Alone
Ending 5: Slow Life
Ending 6: High Loop
To trigger this ending, my loop count must be above 8 or I need to have cleared another route previously.
Ending 7: Low Loop (Secret Ending)
For the Low Loop ending, I suggest following the specifics mentioned in the dedicated Secret Ending section that follows.
How Priest Points Work
This route calculates hidden Priest points. At the hand scene in part 3, my total governs which choices I have available, with unavailable options appearing greyed out.
| Priest points | Choices available at the hand scene |
|---|---|
| 0 or 1 | Refuse the hand or take it; the red choice is unavailable. |
| 2 to 4 | All three choices. |
| 5 or more | Only the red choice; both other options are off-limits. |
A handy list keeps track of Priest points and sanity fluctuations resulting from dialogue:
| Choice | Priest points | Sanity |
|---|---|---|
| Part 1: That is to say, I cursed someone? | 0 | -5 |
| Part 1: Has my fate been changed by someone’s curse? | 0 | +5 |
| Part 1: There’s no such thing as fate! | 0 | 0 |
| Part 1: Indeed, this might be the miracle from the god above | +1 | -7 |
| Part 1: This isn’t the miracle from the god at all | 0 | +2 |
| Part 1: Even so, I have to kill him | -1 | 0 |
| Part 1: I need first to hear what he has to say | 0 | 0 |
| Part 1: Trust the Priest | 0 | -20 |
| Part 1: Don’t trust the Priest | 0 | +2 |
| Part 2: Open mouth. | +1 | -3 |
| Part 2: I’m afraid I’ll have to turn down your goodwill | 0 | +2 |
| Part 2: What’s the meaning of hearing all these? | -1 | +2 |
| Part 2: Just listen quietly. | 0 | 0 |
| Part 2: I can’t | 0 | +3 |
| Part 2: Give up on all partners except the Priest | +10 | Huge loss |
| Part 2: That’s only a skull, a thing, nothing more | 0 | +2 |
| Part 2: If you treasure it so much, then I’ll leave it to you. | 0 | +3 |
| Part 2: (Silent) | 0 | 0 |
| Part 3: Don’t even think about it. | 0 | +3 |
| Part 3: …Just a little, maybe. | +1 | -5 |
Sanity adjustments: In the hand scene, maintaining a sanity level of 50 or under provides various Priest points—lower levels yield increased points, while higher values add nothing, making certainty in response selection important.
My save strategy: I aim for the hand scene with 2–4 Priest points and save, ensuring access to all three choices which will facilitate pursuing every possible Priest ending from that point onward.
Secret Ending – Priest Low Loop Route
The Priest’s optimal ending comes with the most stringent requirements. It’s advisable to prioritize this route initially, as achieving other endings may interfere with unlocking this one.
Secret Ending Requirements
- Loop count of 8 or less: I require this count when defeating the Priest. Each game over counts as one, extending the threshold beyond 7 loops starting a new game.
- No disqualifying route clears: Acquiring the Hero, Mage Magic, or Warrior Idol or Miniature Garden endings disqualifies me. Finishing the Warrior route before this isn’t advisable.
- Priest points: 4 or fewer points are necessary at the part 3 hand scene.
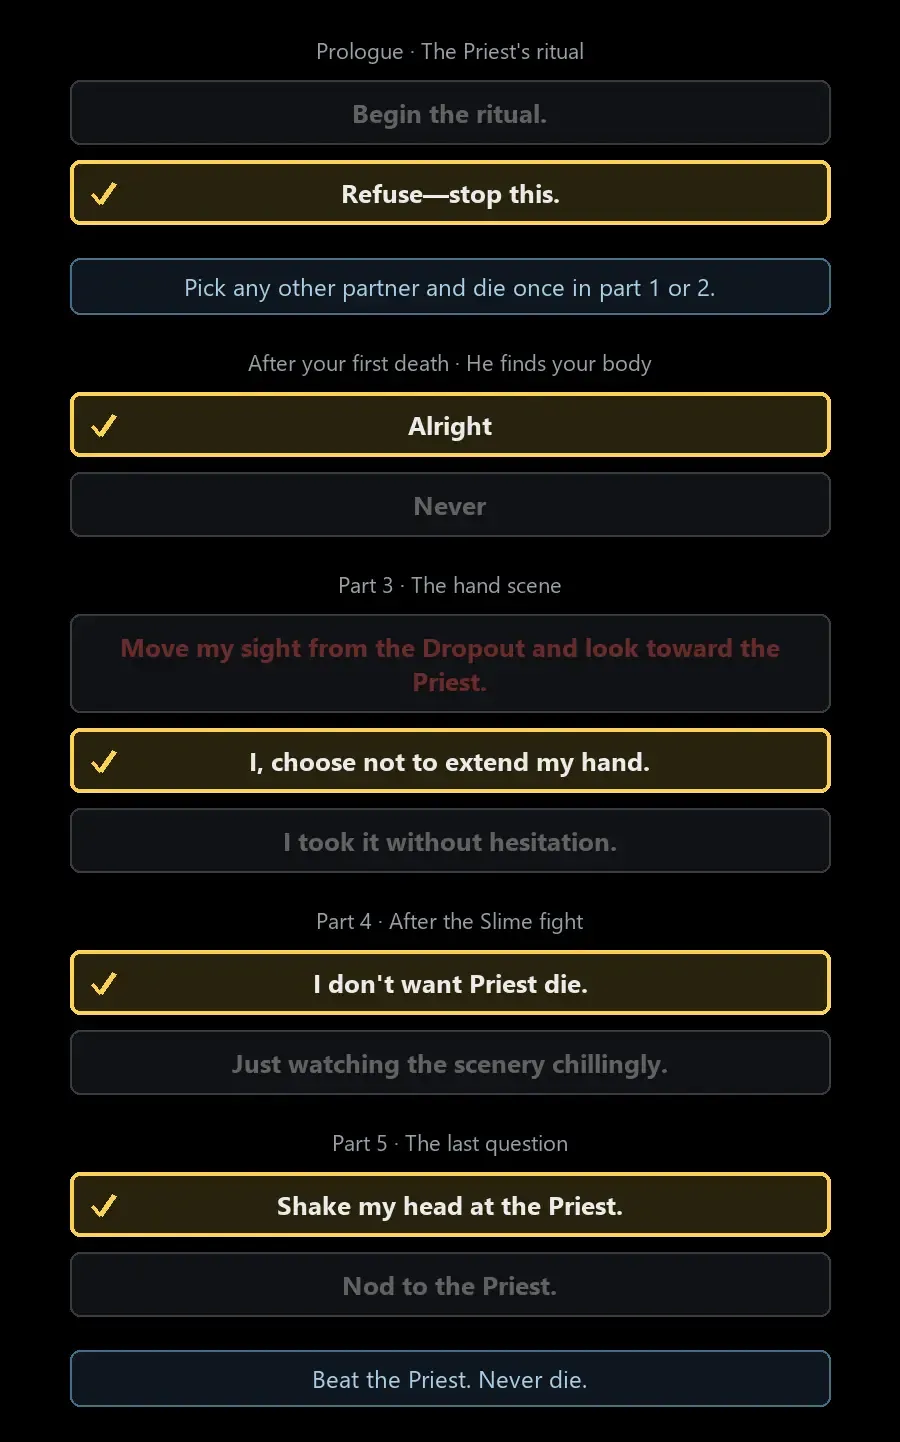
Before Starting the Secret Ending
- I disable Steam Cloud for Annihilated, delete existing save data, and initiate a new game.
- During the prologue, I engage the Hero, Warrior, and Mage in every available dialogue option to boost my starting sanity.
Rules I Follow During the Run
Once the Priest finds my body, I avoid all genuine game overs. Should defeat seem imminent, I reload prior to the death scene. These revival methods are safe concerning my loop count:
- The Immortality Potion (Undying).
- Items allowing survival at 1 HP instead of dying. These do not activate in the final Priest battle where the curse will save me.
- The Priest’s Resurrection: Curse.
- Curse resurrecting me during the final Priest fight.
Before reaching the hand scene, I must keep my sanity above 30 to avoid excessive Priest point accumulation. Specifically, I should sidestep the heavy sanity drop from “Trust the Priest” (-20).
I should also stockpile curse for the final fight against the Priest. If I deplete my HP and run out of curse, it results in a real game over.
Other Endings I Can Try Before Low Loop
Important: This section is based on game files and lacks verification through gameplay. These endings should neither count as route completes nor add loops, thus ensuring the Low Loop chance remains intact. For utmost safety, complete the secret ending first on an untouched save, minimizing all deaths except the singular one required to unlock the Priest.
- Hero: Dropout and Distrust.
- Warrior: Glitched World and Dropout.
- Mage: Unspoken, Love, Friendship, and Sheer Guts.
- Priest: All endings.
Avoidingspecific finishes, like the Hero ending or Mage’s Magic ending, is prudent prior to Low Loop since they count as clears. Additionally, the Warrior’s Idol, Miniature Garden, Burden, and Glitched Idol endings should be missed as they always add a loop, with Idol and Miniature Garden categorizing as clears too.
If I fulfill the strictest requirements, the secret ending should activate, transitioning the title screen to depict the entire party united in the tavern.