
Conquering the time loop puzzle in We Were Here Tomorrow takes careful coordination between you and your partner as you break four crystals across three distinct loops. You will need to complete two separate recording phases first so your temporal clones can replicate your movements and help you reach distant areas in time.
This puzzle usually trips up duos who fail to synchronize their button presses or run out of time during the final chaotic dash. I always recommend doing a quick dry run of your route before recording so neither of you wastes precious seconds stumbling into walls.
This walkthrough breaks down the exact steps for Player 1 and Player 2 across all three phases, including how to handle tricky elevator levers and invisible collision barriers.
Player 1 handles the cube weapon throughout these loops, while Player 2 relies on the suction cup weapon for mobility. Keep in mind that each new phase completely replaces your previous recording, so everyone must execute their assigned tasks cleanly before the timer expires.
We will walk through the exact routing required for both roles from the first button activation up to the final crystal break.
Phase 1: Activate the Six Buttons at Crystal 1
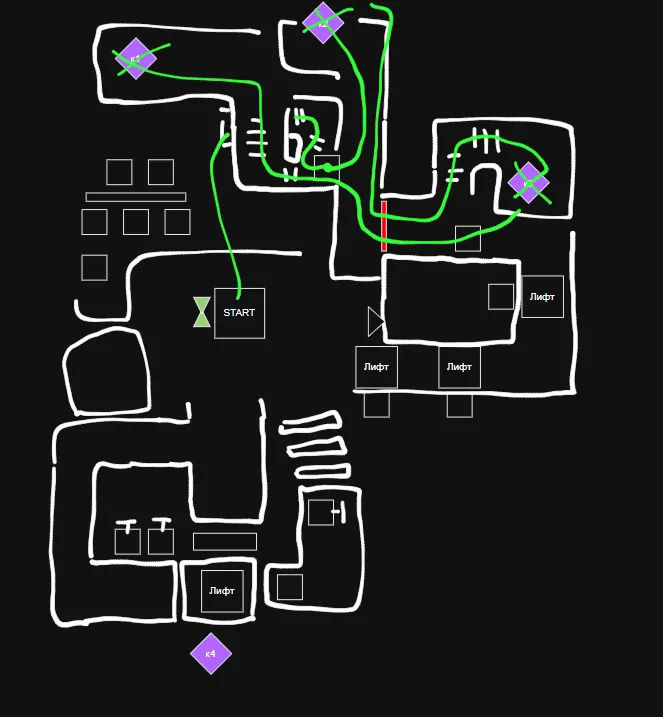
Route Map:
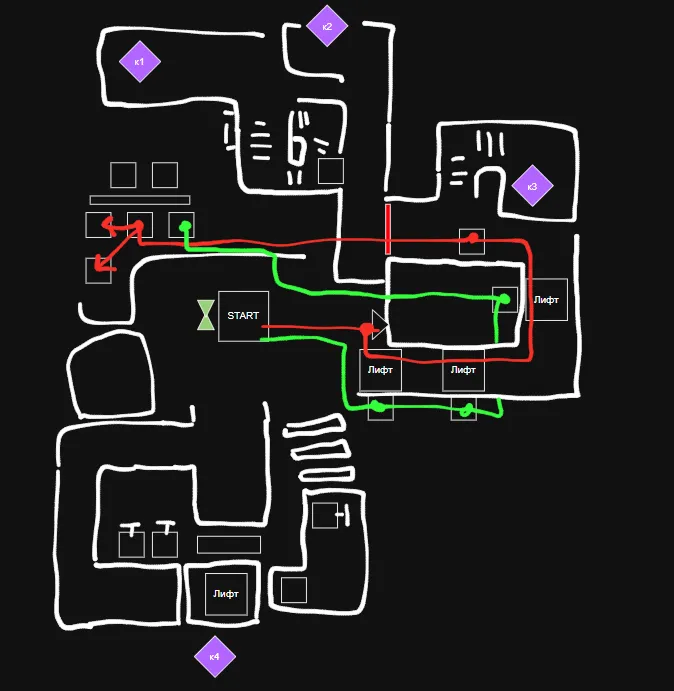
Kick off this mission by heading straight toward Crystal 3. Your primary objective here is to activate all six pressure buttons near Crystal 1 and keep them weighed down until the phase timer runs out.
Steps for Player 1 and Player 2
Reach the first elevator: Both players leave the starting point and head toward Crystal 3. Player 1 places two cubes next to the first elevator to make a step, then Player 2 waits for Player 1 to climb up before activating the lift.
Cross the elevator section: Keep moving forward while activating the three elevator buttons along the path so Player 1 can make it inside the castle.
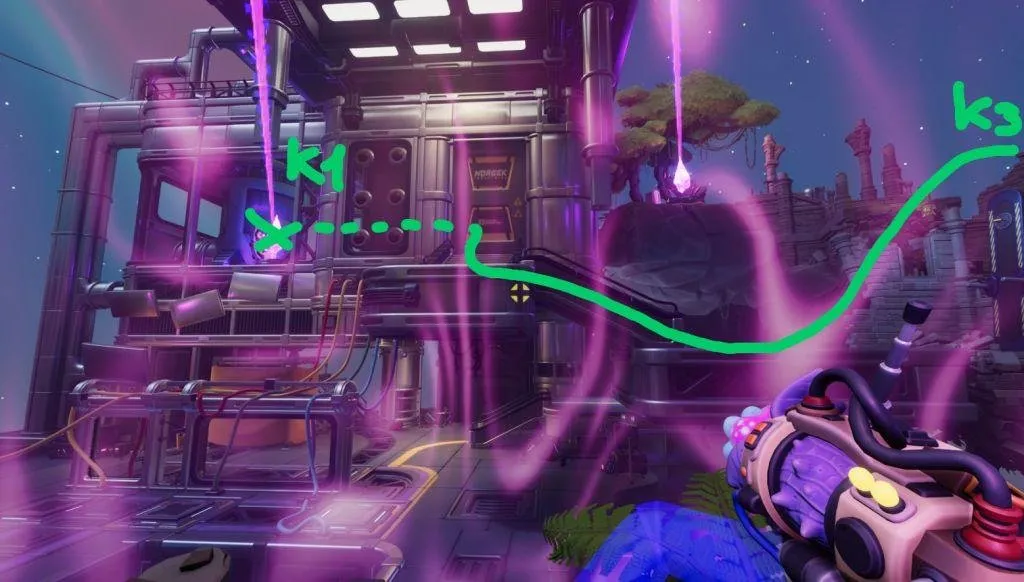
Open the castle door: Player 1 places a cube on the interior castle button to open the main door, then sprints toward Crystal 1. Player 2 activates the final elevator and follows toward Crystal 1 as well.
Activate all six pressure buttons: Player 1 retrieves the cube from inside the castle and uses the available cubes to weight down the required floor pads near Crystal 1. Arrange them so that all six plates stay depressed simultaneously.
Hold the remaining buttons: Both players step onto the leftover unweighted buttons and hold their positions until the recording phase concludes.
Pro tip: Always double-check that all six plates are actively glowing before the timer runs out, because your clones must mimic this exact setup later.
Phase 2: Prepare the Elevator at Crystal 4
Route Map:
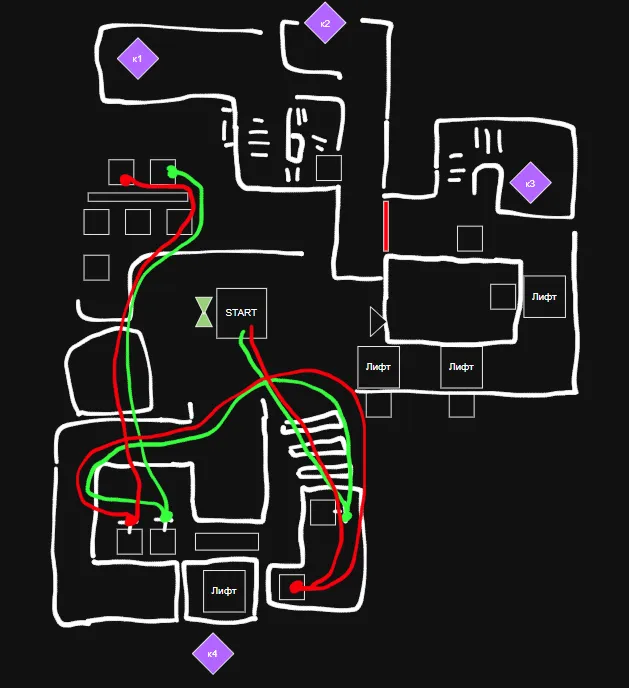
During the second loop, you both head toward Crystal 4 to record the movements needed for reaching the upper levels and unlocking the path to Crystal 1.
Steps for Both Players
Reach Crystal 4: Sprint away from the start and move toward Crystal 4. Running and jumping across the shard staircase is much faster than dealing with the slower climbing animations.
Activate the canopy: Player 1 runs ahead and places a cube on the canopy button to spawn a route toward the lift. Meanwhile, Player 2 pulls the lever to open the nearby door.
Operate the elevator levers: Walk through the open door together and grab the elevator levers. Pull them down simultaneously and hold them firmly until you hear the audio cue say three.
Release the levers together: The exact moment the voice announces three, both of you must let go of the levers at the same time.
Return to Crystal 1: Sprint over to Crystal 1 and occupy the remaining unpressed floor buttons. Stand still on those plates until the recording timer ticks down to zero.
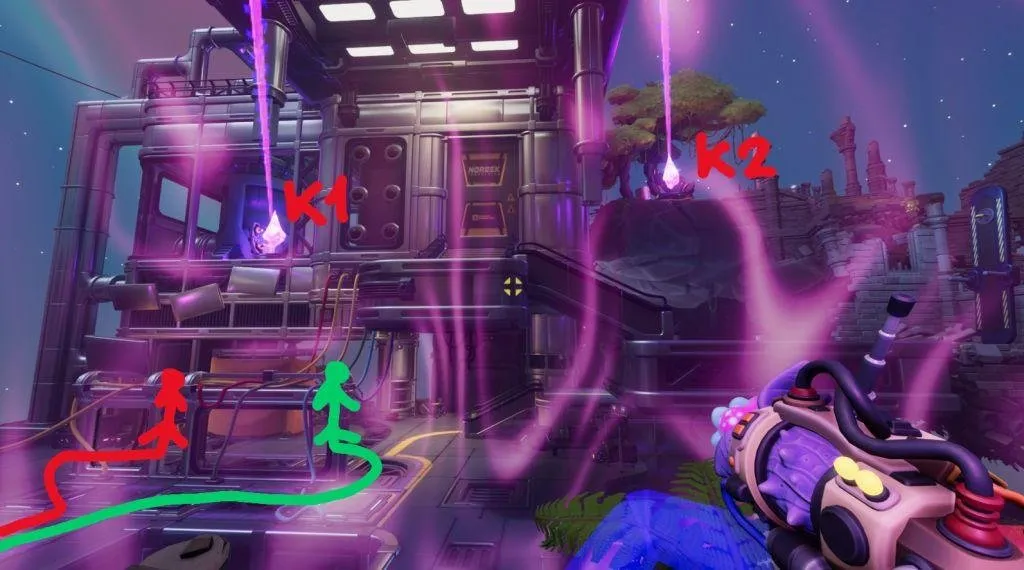
With both recordings successfully stored, you are finally ready to tackle the frantic final loop.
Phase 3: Break All Four Crystals
Route Map
This final phase puts your recordings to the test as your temporal clones replay your past actions. Their presence lets you bypass strict movement restrictions and reach high-altitude crystals before time runs out.
Both players must split up and execute precise paths to smash all four targets.
Player 1: Break Crystal 4 and Crystal 1
Player 1 kicks off this phase by tackling Crystal 4 first before pivoting over to Crystal 1.
Run toward Crystal 4: Cut straight through the center courtyard and head directly for Crystal 4.
Use the canopy and elevator: Wait for your clone to trigger the canopy, leap onto it, and step right into the elevator cabin.
Reach the upper level: Let your automated clones operate the lift to elevate you safely, then smash Crystal 4 once you arrive.
Move toward Crystal 1: Drop down from the platform and sprint toward Crystal 1. Stick to the stone path on the left rather than wasting time on the central routing.
Break Crystal 1: Charge through the open doorway and attack Crystal 1 to shatter it.
Doorway tip: You might run into an invisible collision barrier right at the open door after climbing the stairs. If your character gets stuck, simply jump forward to clear the hidden boundary.
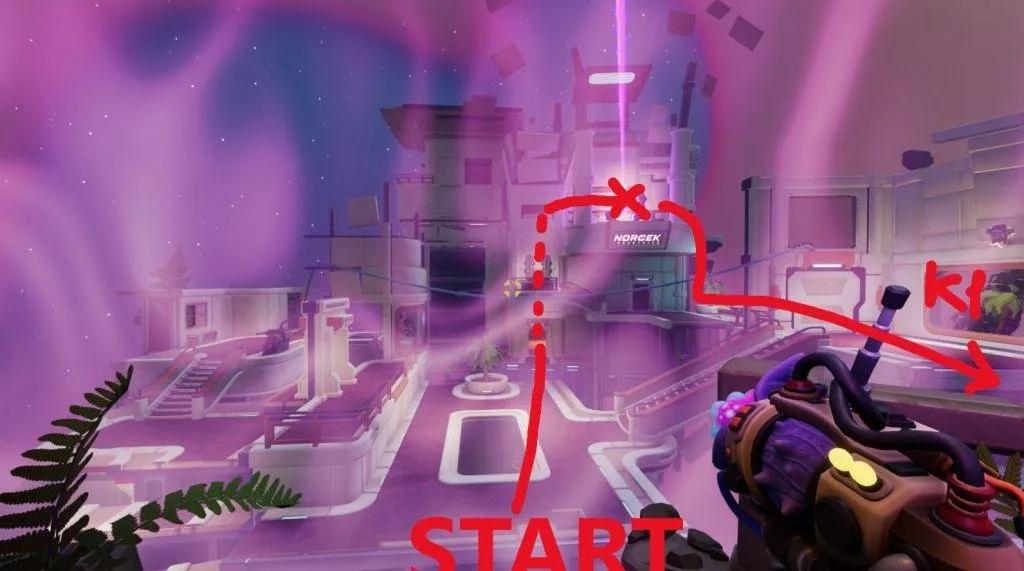
Player 2: Break Crystal 2, Crystal 3, and Crystal 1
Player 2 faces a much longer itinerary and must maintain a rapid pace between all three crystals.
- Reach Crystal 2: Use your suction cup tool to scale the staircase leading to Crystal 2, then press F to drop the bridge.
- Use the charged cube: Spot the active charged cube hovering to your left and interact with it to launch yourself upward.
- Break Crystal 2: Land on the elevated platform and smash Crystal 2.
- Enter the castle: Head down the stairs toward the castle, sprint along the balcony, slip through the open door, and take a left up the interior stairs.
- Break Crystal 3: Climb to the top of the staircase and destroy Crystal 3.
- Return to Crystal 1: Drop down from the Crystal 3 balcony onto the stairs below, then run toward the Crystal 1 entrance that your clones should have unlocked.
- Jump through the doorway: Leap past any invisible collision barriers blocking the threshold, then shatter Crystal 1 to finish the puzzle.
What If You Fail to Break a Crystal?
You absolutely must shatter all four targets before the final timer hits zero. If you miss even a single crystal or run out of time, head over to the recording machine near your spawn point and reset your clones.
You will spot this machine easily by looking for the hourglass icon marked directly on your map.
Just remember that starting over from Phase 1 is always safer than trying to salvage a botched recording run with incomplete clones.