
One of the biggest mistakes new Clash of Critters players make is investing resources into the wrong critters during the early game. Wish Boxes, evolution materials, and duplicate critters are limited when you’re first starting out, which means every upgrade matters. Evolving the wrong unit can slow down your progress in Horde, Gold Rush, Dojo, PvP, and Story content.
This tier list focuses specifically on the jump from Tier 1 to Tier 2. It is not a Tier 3 ranking and it is not an endgame tier list. Some critters become incredible at Tier 3 but are only average at Tier 2. Others are already powerful at Tier 2 and can carry your account through a huge portion of the game.
When deciding who to evolve first, it’s important to think about immediate value rather than future potential. The goal is to get the strongest possible team while spending the fewest resources.
Clash of Critters T1 to T2 Priority Tier List and T2 / T3
Tier list T2 / T3

Before using this tier list, keep in mind that it is divided into two sections.
The top half focuses on the best evolution priorities from Tier 1 to Tier 2, while the bottom half focuses on Tier 2 to Tier 3 upgrades.
You may notice that some popular Tatari are ranked lower than expected in the Tier 1 to Tier 2 section. This is because the list evaluates how strong a Tatari is at that specific stage of progression, not its overall endgame power.
Some Tatari have mediocre Tier 2 upgrades but become extremely powerful once they reach Tier 3. Monkey is a good example of this. While it is considered one of the strongest units in the game later on, its Tier 2 upgrade is not nearly as impactful as some other options.
The main purpose of this tier list is to help newer players spend their resources efficiently and avoid investing in upgrades that provide little immediate value. Following these priorities can make early progression much smoother and help you build a stronger roster faster.
CLASH OF CRITTERS – T1 TO T2 PRIORITY LIST
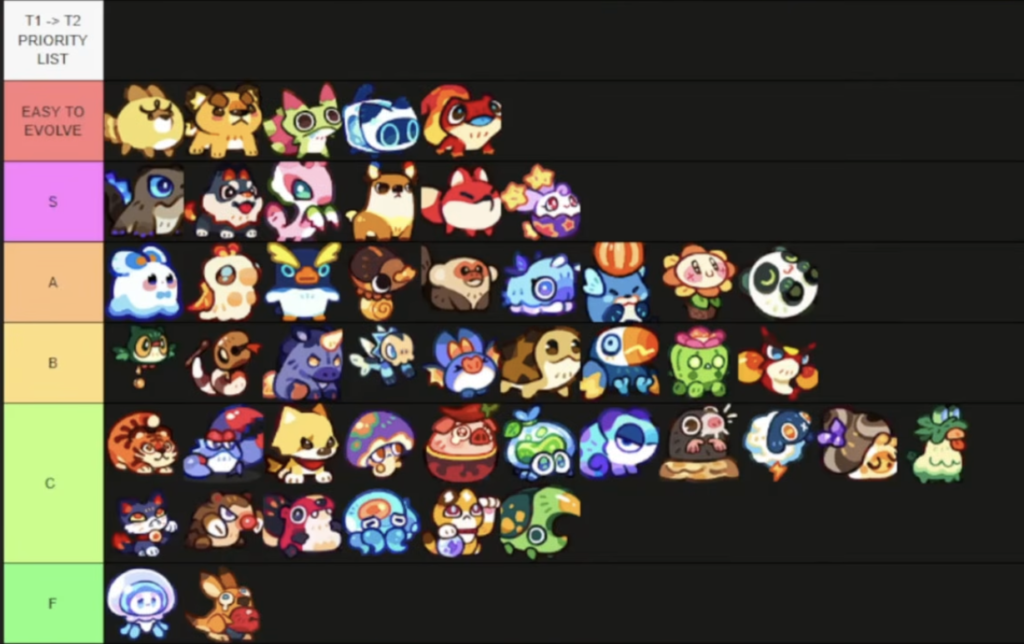
S Tier Critters
These are the critters that should be your highest priorities. They either gain huge power spikes from early evolutions, dominate multiple game modes, or remain useful even after you unlock stronger options.
Zapper
Zapper is one of the easiest critters to recommend for new players. One of the biggest advantages is that he is very easy to evolve because he only requires Silver Stars for his Tier 3 evolution instead of demanding full Gold Stars.
His kit combines knockback effects with damage boosts, making him valuable across multiple modes. Knockback becomes surprisingly useful when dealing with large enemy groups because it creates extra time for your other damage dealers to work.
Because of his low investment requirements and strong utility, Zapper offers excellent value early on.
Froggling
Froggling is one of the strongest early-game investments available.
The combination of strong AoE damage and excellent attack range allows Froggling to clear groups of enemies efficiently while staying relatively safe. Like Zapper, Froggling is easier to evolve than many other critters because it does not require Gold Stars for progression.
For players looking for a reliable damage dealer that remains useful throughout much of the game, Froggling is an excellent choice.
Krygolin
Krygolin stands out as one of the strongest Water DPS critters currently available.
The critter offers excellent AoE damage and scales very well into later content. Even experienced players continue using Krygolin because of its ability to deal consistent damage across multiple targets.
For anyone building a Water team, Krygolin should be one of the first priorities.
Blue Flick
Blue Flick’s strength comes from burn damage that scales based on enemy HP.
This makes Blue Flick particularly effective against tougher enemies and bosses because the burn remains relevant even when enemy health pools increase dramatically.
On top of that, Blue Flick is relatively easy to evolve and remains effective throughout much of the game’s content.
Ruxilla
Ruxilla is one of the strongest all-around critters in the game.
The reason so many players recommend Ruxilla is because it performs well almost everywhere. Horde, Gold Rush, Dojo, PvP, and general PvE content all benefit from its combination of three-lane coverage, high HP, strong defense, and excellent damage output.
Few critters offer this much versatility.
Pyro Hound
Pyro Hound is another critter that performs exceptionally well across multiple game modes.
Its three-lane coverage alone would already make it valuable, but the addition of the Weaken debuff at Tier 3 pushes it even further.
Pyro Hound shines particularly in Dojo and Gold Rush where reducing enemy effectiveness while dealing consistent damage can make a major difference.
Mantis
Mantis is arguably the strongest Grass critter currently available.
The addition of Fragile at Tier 3 significantly increases team damage output because affected enemies take more damage from every source.
Mantis also benefits from strong lane coverage, making it useful in Horde mode where multiple enemy lanes need to be controlled simultaneously.
Panther
Panther combines excellent damage, strong coverage, and Paralysis effects into one package.
Paralysis provides valuable crowd control while the high damage output ensures enemies don’t stay alive long enough to become a problem.
Players looking for a critter that performs well in almost every mode should prioritize Panther very highly.
Sparky
Sparky becomes exceptionally powerful because of its Bloom mechanic.
The blooms generate explosive stacks that deal additional damage when triggered. Even before reaching Tier 3, Sparky already performs well, but later evolutions unlock its full potential.
For players planning long-term investments, Sparky is one of the safest choices available.
Cheerling
Cheerling is one of the strongest support critters in the entire game.
While some players argue Wave Flutter is stronger overall, Cheerling is unquestionably the best support option available to most early-game players.
Cheerling provides invisibility, attack buffs, defense buffs, healing, and survivability improvements. Having Cheerling on your team dramatically increases the effectiveness of almost every damage dealer in the game.
Few critters provide as much value as Cheerling.
A Tier Critters
These critters are excellent investments but usually fall slightly behind the top-tier options.
Droplet
Droplet gains three-lane coverage alongside Fragile and Slow effects.
The combination of utility and damage amplification makes Droplet one of the strongest support-focused critters available.
It performs well in Horde, Gold Rush, PvP, Dojo, and almost every major activity.
Ash Larva
Ash Larva functions as both a tank and a support unit.
It offers high HP, strong defenses, healing effects, and attack boosts. One of the reasons players value Ash Larva so highly is because it combines multiple roles into a single team slot.
The jump from Tier 1 to Tier 2 is especially noticeable, making it an excellent investment.
Penguin
Penguin provides Chill and Shield effects that improve survivability significantly.
While it eventually gets replaced by stronger options, it remains one of the most reliable Water critters during the early and mid-game.
The defensive utility alone makes it worth considering.
Humberg
Humberg offers AoE damage and slowing effects.
Slows become extremely valuable in modes where controlling enemy movement matters, allowing your team to deal more damage before enemies reach important positions.
Monkey
Monkey is widely considered one of the strongest DPS critters in the game.
The only reason it is not ranked even higher here is because this list focuses on Tier 1 to Tier 2 progression rather than Tier 3 performance.
At Tier 3, Monkey becomes one of the most powerful critters available.
Dealgrub
Dealgrub gains access to Sleep effects and additional crowd-control utility.
While it reaches its full potential at Tier 3, it remains a valuable investment because crowd control is useful in nearly every game mode.
CEO
CEO combines strong damage output with Weaken effects and bouncing attacks.
The extra bouncing attacks significantly improve damage distribution across enemy groups, making CEO valuable in Horde and Gold Rush.
Solar Flare
Solar Flare is frequently used in Horde, PvE content, Dojo, and boss encounters.
While not always the centerpiece of a team, Solar Flare consistently performs well enough to justify investment.
Panda
Panda earns its position largely because of its Dojo value.
Many players rely on Panda to clear difficult Dojo stages, making it more useful than some critters that might appear stronger on paper.
Hooklet
Hooklet is one of the strongest Grass critters available.
At Tier 2 it gains Slow and Stun effects, while Tier 3 adds even more powerful control abilities.
Hooklet remains useful for a very long time and pairs especially well with other top Grass units like Mantis.
Snake
Many players underestimate Snake.
However, Snake becomes one of the strongest Earth critters once evolved. Full-lane coverage combined with Pierce damage gives it tremendous offensive value.
Snake is one of the best long-term Earth investments available.
B Tier Critters
These critters are useful but should usually be evolved after your higher-priority units.
Volkmar
Volkmar offers high single-target damage and strong Horde performance.
Its full-arena coverage makes it particularly useful in modes where enemies appear across multiple lanes.
Max Fry
Max Fry provides Weaken effects alongside pulling mechanics.
Pulling enemies into favorable positions can be extremely powerful when used correctly, especially in Horde mode.
Bat
Bat gains Fragile effects that stack with other Fragile sources like Mantis and Droplet.
Because it remains useful at Tier 2, players don’t need to rush Tier 3 immediately.
Toucan
Toucan provides attack and defense boosts while offering free-lane coverage.
The main limitation is that enemies must be positioned correctly to trigger its buffs consistently.
Cactus
Cactus provides surprisingly strong DPS for early-game players.
Its damage remains useful even at lower evolution levels, making it a reliable filler damage dealer.
Shrimp
Like Cactus, Shrimp offers strong DPS relative to its investment requirements.
Players looking for affordable damage options can safely use Shrimp during the early game.
Tiger
Tiger’s healing utility makes it useful for Dojo progression.
However, the benefits gained from Tier 3 generally do not justify heavy investment.
Crab
Crab becomes much stronger at Tier 3 thanks to Shredded effects and healing.
While it remains useful earlier, most of its true value appears later.
C Tier Critters
These critters have niche uses but generally should not be major priorities.
Boat Kid
Boat Kid specializes in Paralysis effects.
Its usefulness is mostly limited to specific enemies and situations.
Spore
The jump from Tier 1 to Tier 2 is very small for Spore.
Since its abilities remain largely unchanged, the investment usually isn’t worthwhile compared to stronger options.
Big
Big provides healing but also damages itself.
Keeping it at Tier 2 is usually sufficient.
Sakuling
Primarily useful in Dojo content.
Outside of that, there are generally stronger options available.
Chameleon
Situationally useful but rarely essential.
Mole
Can perform adequately in specific situations but lacks the overall value needed for higher rankings.
Fluffo
Mostly useful for Fish Boss encounters.
Outside of that niche, Bat usually performs better.
Gem Snail
Gem Snail creates crystals that can help stall enemies and protect backline units.
While occasionally useful, it is rarely worth prioritizing.
Yama
Yama performs reasonably well against bosses but struggles to justify investment when compared to stronger Grass alternatives.
Cat
Cat was significantly stronger before balance changes reduced its effectiveness.
It is no longer considered a major priority.
D Tier Critters
These critters have very limited value and should generally be ignored unless required for specific strategies.
Skunk
Mostly used for certain boss encounters and niche situations.
Octopus
Very situational and primarily relevant in certain Dojo scenarios.
Neko Lot
Can function in Horde with the right setup but requires significant support to perform effectively.
Goonbug
Provides very little value from Tier 1 to Tier 2 and can often be used effectively without investing additional resources.
F Tier Critters
These are the lowest-priority critters and should generally be avoided.
Yan Jelly
Yan Jelly can produce respectable damage under perfect conditions, but it requires heavy support and protection to function properly.
For most players, the investment simply is not worth it.
Panchaku
Widely considered one of the weakest critters available.
The resources required to make Panchaku useful are better spent elsewhere.
Best Early Evolution Priorities
If you’re unsure where to spend your resources, focus on these critters first:
- Cheerling
- Mantis
- Panther
- Ruxilla
- Froggling
- Krygolin
- Sparky
- Pyro Hound
- Hooklet
- Snake
These critters provide the best balance of progression speed, versatility, and long-term value while helping you clear the widest range of content.