
Heavy Guardian is one of the most reliable and beginner-friendly tank classes in Blue Protocol: Star Resonance (BPSR). This class focuses on durability, control, and party protection — allowing you to absorb hits that would flatten anyone else.
With two main specializations — Block and Earthfort — Heavy Guardian lets you choose between pure mitigation and shield-based sustain. Respeccing between the two is easy and inexpensive, so feel free to experiment to find your preferred playstyle.
Specs Comparison
| Aspect | Earthfort Spec | Block Spec |
|---|---|---|
| Playstyle | Shield-focused sustain | Mitigation-based tanking |
| Survivability | Extremely high through shields | High through constant DR uptime |
| Ease of Play | Smooth rotation, scales late | Simple rotation, effective early |
| Healer Dependence | Low | Moderate |
| Flexibility | Limited skill choice | Easy to slot utility skills |
| Damage Output | Moderate | Low–moderate |
| Scaling | Feels great late game | Feels strong even early on |
Earthfort keeps you alive with rotating shields and sustained protection.
Block, on the other hand, relies on managing mitigation windows and damage reduction uptime.
Both are viable for endgame — the choice comes down to whether you prefer a steady shield rotation or cyclic defense windows.
BLOCK SPEC GUIDE
Block Spec emphasizes damage reduction rotation — cycling skills like Brave Bastion, Countercrush, and Granite Fury to maintain constant mitigation.
The spec is simple to play, making it accessible for new tanks, but it truly shines once you reach mid-to-late game stat thresholds.
Class Mechanics
Block Duration (Fiery Bar):
The brown bar under your character represents your temporary 100% block chance granted by Countercrush. Refresh it as soon as it empties.
Sand Crystals:
Core resource used and replenished through skills like Granite Fury, Collapse Loop, and Sandshroud.
Rage:
Generated through attacks and spent on Countercrush. It also contributes to rock bullet creation, influencing later talents.
Rock Bullets:
Accumulate up to 20 to empower your Granite Fury for a stronger cast. This mechanic is relevant if you take the final node in your talent tree.
Key Stats
Main Priority:
Luck → Mastery → Versatility
Luck is your most important substat — it enhances scaling for multiple skills and smooths out performance. Mastery follows closely for consistent damage and shield efficiency.
Substat Hierarchy (Purple):
Strength → Resilience Break → Armor → Stamina
Gems: Focus on Luck and Strength to maintain luck-stacking synergy.
Aim for full 4-piece raid set or higher to unlock peak performance.
Skills
Normal Attack – Basic rage generator.
Used in downtime to maintain resource flow.
Countercrush (Special Skill)
Consumes 40 Rage, granting 100% block chance and 30% DR.
Your main defensive tool. Refresh frequently for constant protection.
Collapse Loop (Ultimate)
Massive taunt that grants 100% physical defense, +50% HP, and 40 Rage.
Ideal for regaining aggro, surviving bursts, or starting rotations.
Granite Fury (Specialization Skill)
Consumes 3 Sand Crystals for 10% DR over 10s.
Your bread-and-butter spam skill; maintain uptime.
Brave Bastion (Specialization Skill)
Provides 15% increased block DR and taunts enemies.
Use off cooldown to sustain high mitigation.
Sandshroud (Specialization Skill)
DOT skill that generates 35 Rage and 6 Sand Crystals.
Core resource engine in early and mid-game.
Optional Utility Skills
| Skill | Role | Notes |
|---|---|---|
| Sandgrip | AoE pull | Great for mob control; weak on bosses. |
| Star Shatter | CC & resource gen | Best filler skill for downtime. |
| Sandward | Invulnerability | Lifesaver for high-end dungeons. |
| Stoneform | DR & taunt | Reliable panic skill; useful for difficult fights. |
Recommended Skill Progression
Book Upgrade Priority:
Granite Fury → Countercrush → Brave Bastion → Collapse Loop → Star Shatter → Basic Attack
Rotation Example:
Countercrush → Brave Bastion → Granite Fury spam → Refresh Countercrush → Use Star Shatter / Sandshroud / Ult for resource recovery.
Talent Tree (Generalist Setup)
General-purpose build focusing on efficient DR uptime and resource flow.
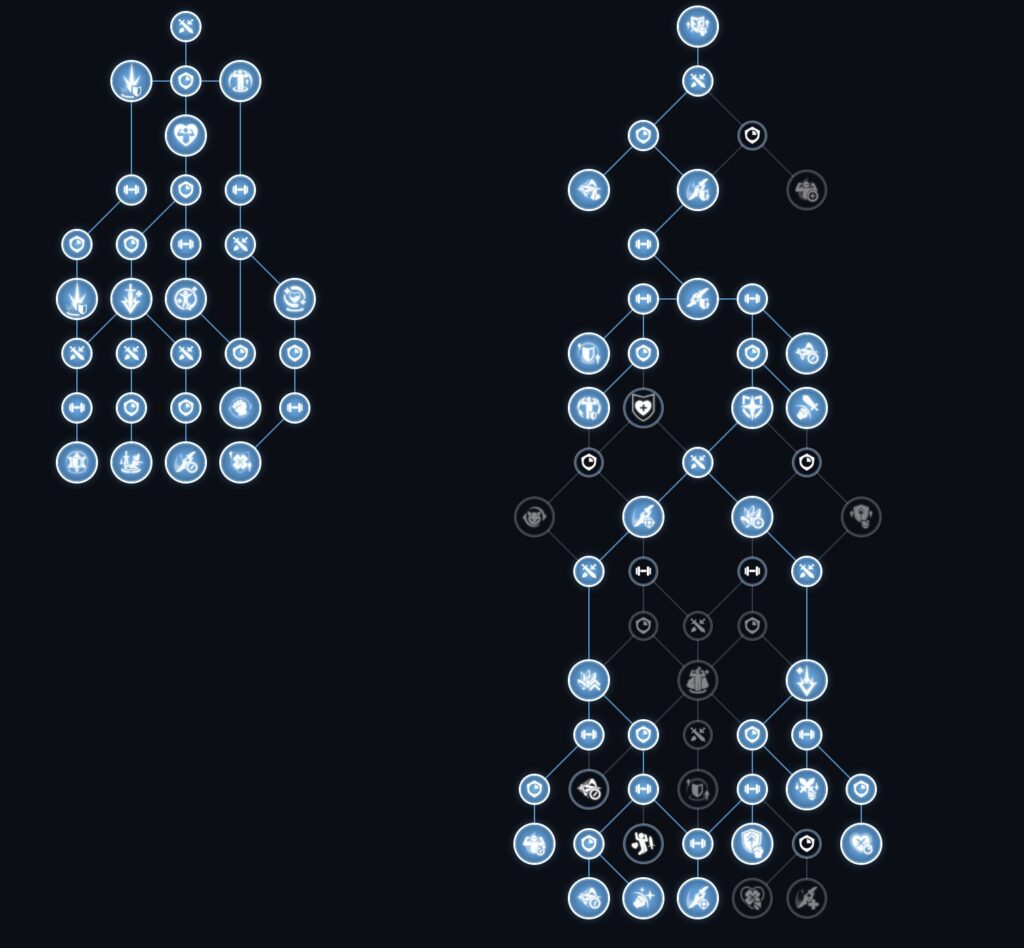
Notes:
- Pick Survival Instinct + Shadowveil for harder content.
- Drop low-value purple nodes to fit survivability talents if needed.
EARTHFORT SPEC GUIDE
Earthfort specializes in shield generation rather than direct damage mitigation.
Your rotation focuses on continuously creating near-full HP shields, making you nearly unkillable once mastered.
Class Mechanics
Sand Crystals: Consumed by Shield Bash and Rage Burst, generated by Sandshroud and Star Shatter.
Rage: Powers Shield Bash and Rage Burst for instant shields and interrupts.
Earth Crystals: Track stacks from consuming sand crystals. At 20 stacks, Star Shatter evolves into Starfall for massive impact.
Key Stats
Main Priority:
Versatility → Mastery → Haste
Versatility offers overall balance — damage dealt, damage taken, and shield scaling. Mastery enhances shield power, while Haste improves rotation speed.
Substat Hierarchy (Purple):
Strength → Resilience Break → Armor → Stamina
Gems:
Prioritize Mastery and Strength.
Mastery + Endurance is acceptable for hybrid scaling.
Core Skills
Normal Attack – Generates Rage, used for filler windows.
Shield Bash (Special Skill)
Consumes Rage and Earth Crystals to generate shields (up to 2 crystals max).
Essential for sustain and damage uptime.
Collapse Loop (Ultimate)
Taunt and gain +50% HP and +100% Physical Defense.
Same as Block spec — core survival tool.
Rage Burst (Specialization Skill)
Consumes Sand Crystals and Rage for a massive shield and 10% DR.
Instant cast with later talents — use as opener and shield reset.
Stoneform (Specialization Skill)
20% DR and AoE taunt.
Effective for stabilizing during burst phases.
Sandshroud (Specialization Skill)
DOT and resource generator. Provides +10% Armor aura through talent.
Star Shatter (Specialization Skill)
Generates Rage, provides CC, and evolves into Starfall at 20 stacks.
Crucial for keeping rotation smooth.
Optional Skills
| Skill | Role | Notes |
|---|---|---|
| Sandgrip | AoE suction | Strong for mobbing, less effective in boss fights. |
Skill Progression
Book Upgrade Priority:
Rage Burst → Shield Bash → Collapse Loop → Sandshroud / Stoneform → Basic Attack
Rotation Example:
Star Shatter → Sandshroud → Stoneform → Rage Burst → Shield Bash → Starfall → Repeat.
Focus on maintaining shields and alternating between Rage Burst and Bash uptime.
Talent Tree (Earthfort)
Balanced for all content with strong shield uptime and burst potential.
Notes:
- Prioritize Rage Burst talents for maximum shield uptime.
- Shadowveil provides DR value for Master-tier content.
- Avoid overinvesting in niche nodes like Slam Shelter.
IMAGINE RECOMMENDATIONS
Best in Slot (BIS)
| Imagine | Effect | Role |
|---|---|---|
| Tina | 50% Party-wide CDR (+10% per upgrade) | Essential endgame support. |
| Tempest Ogre | Gravity suction AoE | QOL for dungeon pulls. |
Strong / Flexible Options
| Imagine | Effect | Role |
|---|---|---|
| Venobzzar Incubator | 8% self vuln debuff / 4% team | Core raid debuff option. |
| Frost Ogre | Spin freeze + Res break | Great CC tool for high-end dungeons. |
| Airona | Party resurrection | Safety net for raids. |
F2P Options
| Imagine | Effect | Role |
|---|---|---|
| Jungle Goblin | +10% Strength | Simple and strong early-game option. |
| Goblin Guard | Block DR and Armor shred | Adds durability and utility. |
Heavy Guardian stands as the cornerstone of tanking in Blue Protocol: Star Resonance.
Whether you prefer the steady rhythm of Earthfort or the aggressive defense of Block, both specs deliver unmatched survivability and presence in any team.