
In Here Comes the Horde, focusing on an archer build lets you dominate the early waves by generating a high number of units quickly. This strategy helped me breeze through Wave 26 with minimal upgrades, relying solely on archers to handle the onslaught. As you push into Waves 27 through 29, some adjustments are necessary to keep your archers viable as the challenge ramps up.
The key here is efficient building placement and prioritizing upgrades that enhance unit production and strength. Expect to manipulate farms and archer sites strategically to maximize output — a good layout is critical for smooth sailing through the waves. Before diving in, it’s essential to know how to arrange your buildings for the best bonuses and unlock the right upgrades early.
The first major tip is to get familiar with the ideal farm and archer placements; this sets the foundation for your entire strategy. Ensure you’re prepared to optimize these setups right from the start.
Best Build Guide
In this guide, I’ll walk you through my archer build specifically designed for Here Comes the Horde. You’ll learn how to position farms and archer buildings for maximum unit output, the best upgrades to prioritize, and how the roles of Construction Workers and Inspiration play into the late-game strategy.
Waves 1-26: Archer Build and Farm Placement
Best Farm and Archer Building Placement
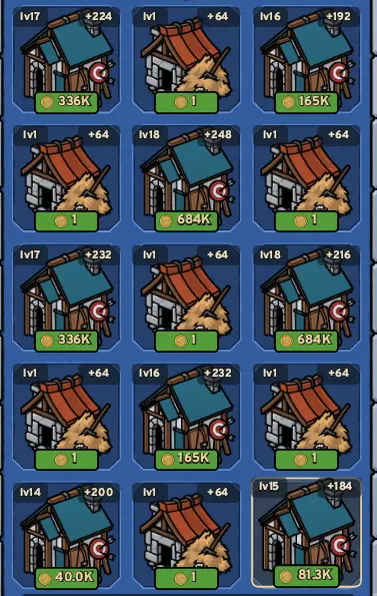
My approach hinges on extracting the most units from farms and archer buildings. Farms can boost unit generation when placed adjacent to other buildings, while archers benefit from isolation but still need a structure in front to maximize their numbers.
By positioning my buildings strategically to capitalize on these bonuses, I can flood the battlefield with archers, minimizing the reliance on other unit types altogether. With the right layout, you can create a rain of arrows that can clear out the waves effectively.
I arrange my buildings around these placement bonuses to maximize the number of archers. With the right layout, I can fill the battlefield with arrows without relying on other unit types.
Best Upgrades and Sheep
When it comes to upgrades, I prioritize everything that helps me boost the generation of archers and farmers. Increasing the range of my archers coupled with generating more income is crucial to sustaining the build.
Additionally, sheep play a vital role in this strategy. I unlock the upgrade that allows archers to target sheep, and make sure to get the one that speeds up sheep respawn too.
Thanks to this building setup and the basic upgrades, making it through Wave 26 is entirely feasible without needing additional unit types.
Using this building arrangement and these basic upgrades, I can make it through Wave 26 without needing other unit types.

Waves 27-29: Construction Workers and Inspiration
Starting at Wave 27, the game ramps up significantly in difficulty. At this stage, I’ll need to bring in other units, but I keep the core strategy anchored on archers since they remain effective.
Unlock Construction Workers
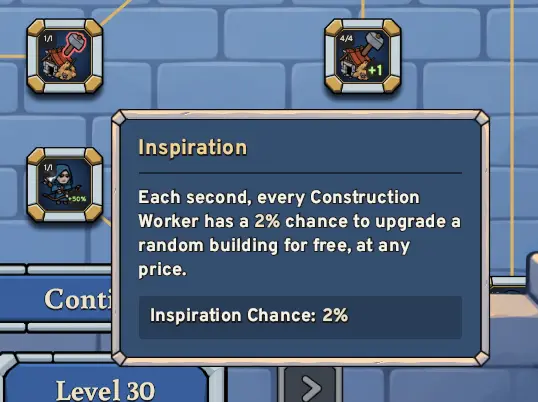
One of the crucial additions here is Construction Workers, which I unlock by acquiring the Knight unit. They expedite the leveling process for my archer buildings.
What makes them especially valuable is the Inspiration upgrade. This capability allows the Construction Workers to exceed standard upgrade limits, significantly boosting my archers’ capabilities.
Unlock Tornado and Rally
Unlock Tornado and Rally
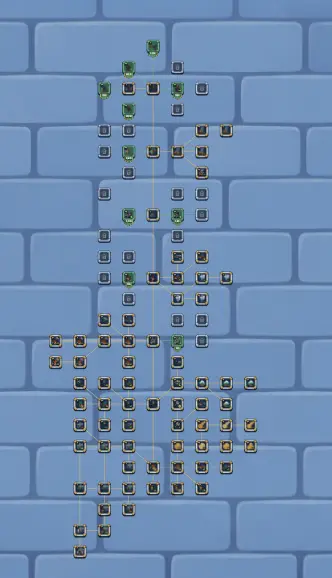
In the later waves, it’s also essential to unlock Tornado and Rally, ensuring I grab all available upgrades for these abilities to further amplify my strategy.
Building Layout and Upgrades
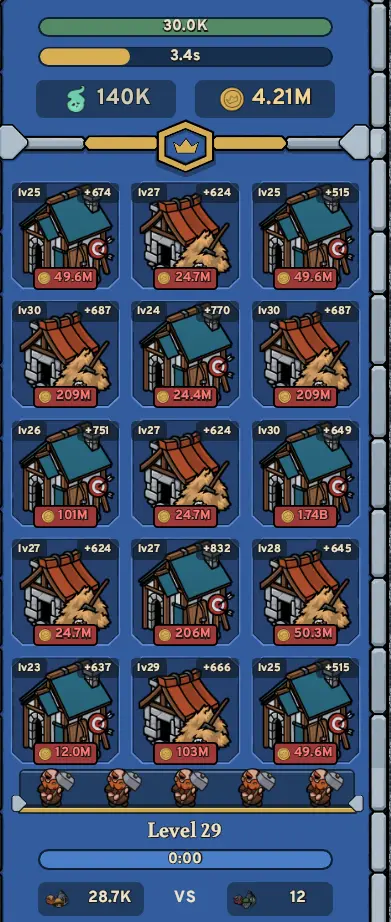
Below are the layout and upgrades I utilize in this phase of my archer build. Following this setup is vital for continued effectiveness in the waves ahead.
Wave 30: Current Build Progress
As of now, I haven’t yet beaten Wave 30 with this build. While the strategy has successfully managed the earlier waves, Wave 30 poses a significant challenge. I’ll keep you posted if I manage to conquer it!