
Getting through the Red Temple in MONOMOON means tackling nine challenging puzzles that test your grasp of the game’s unique number symbols and patterns. You’ll be deciphering clues embedded throughout the temple to ensure you don’t waste precious resources or time. Understand what’s required before you dive in: knowing the codes will help you breeze through these puzzles more effectively.
This journey starts at the eastern quadrant of the map, guiding you through several interconnected challenges. It’s a good idea to familiarize yourself with the number system used in MONOMOON before you arrive — some puzzles can stump even experienced players if they’re not prepared properly. All the codes you need to progress will be laid out clearly. Pro tip: Before entering the temple, ensure you’ve explored the map well enough to recognize key locations and clues.
Let’s dive right into navigating the puzzles and uncovering their solutions.
Map Guide: Coordinates & Numbers
Red Temple Guide: 9 Puzzle Codes & Solutions
I’ve detailed each puzzle in the order I found them, complete with hints and the full solutions. Start with the guidance provided for each puzzle, then check the corresponding solution if you get stuck. Each section includes specific combinations if you prefer quick answers.
Finding the Red Temple
To locate the entrance to the Red Temple, head to the bottom center of the map, specifically at coordinates (15,08). As you wander about, you might see the outline of the temple before figuring out the entry mechanics.
To understand the entrance puzzle, begin your exploration at (13,07).
Hints for Reaching the Red Temple
- Hint 1: Two possible entrances are available. One is blocked by a button and may function as a shortcut, while the other requires using a lift.
- Hint 2: When using the lift, think about its travel path and if you can reach your destination without releasing the left mouse button (LMB).
- Hint 3: Consider what will happen if you release the LMB instead of holding it.
Red Temple Entrance Solution
Once the lift is activated, I quickly teleport to the save point at (13,05). Following this, I move up one screen and jump onto the lift before it departs, allowing me to reach the Red Temple.
Opening the Red Temple Door
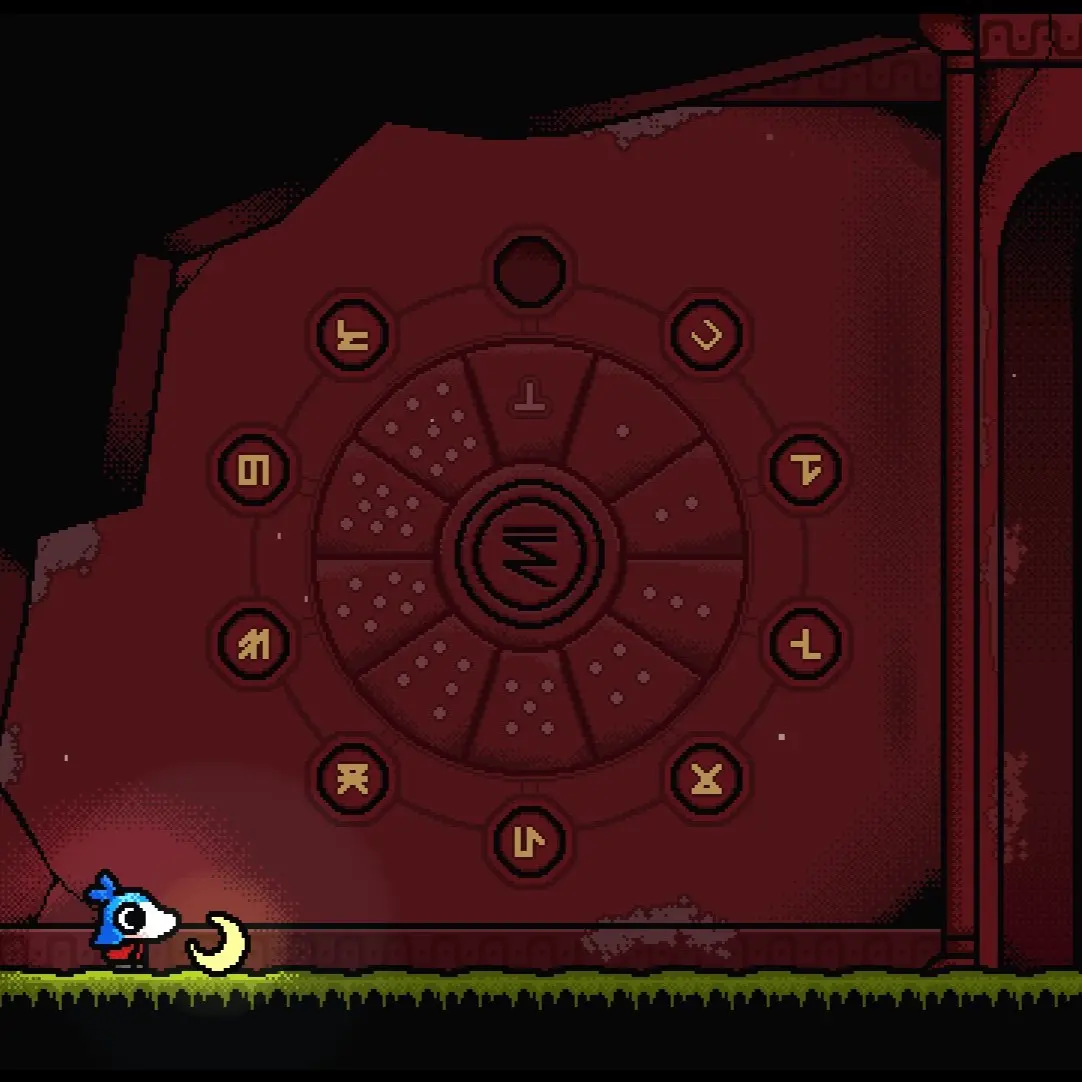
At the Red Temple’s entrance, I find a wheel with mysterious symbols. If these unfamiliar symbols leave you puzzled, it’s wiser to return once you’ve learned more about the game’s number system.
Door Puzzle Hint
The symbols on this wheel represent numbers. Familiarizing yourself with the counting system in MONOMOON will be essential for decoding this combination. The number of dots on each symbol corresponds directly to its numeric value.
Red Temple Door Solution
To unlock the temple door, I need to rotate the symbols into clockwise order from 0 to 9, using the dots to identify each number. Below is the precise arrangement required to gain access.
Red Temple Puzzle 1 Solution
The first puzzle relies on deciphering symbols into specific numbers. A chalk drawing on the wall reveals the combination needed to unlock the next stage.
Puzzle 1 Hints
- Hint 1: Treat the combination as three separate digits instead of a single three-digit number.
- Hint 2: According to the chalk drawing, each horizontal line equals 1.
Puzzle 1 Code
Count the horizontal lines in each symbol and string those totals together to form the combination.
Solution Code: 503
Solution Code: 503
Red Temple Puzzle 2 Solution
The second puzzle makes use of the positions of circles to yield a numerical solution. Rather than counting the circles, I need to focus on how they’re arranged.
Puzzle 2 Hints
- Hint 1: The chalk drawing hints at a value of 0. Look carefully at the arrangements to deduce that.
- Hint 2: Analyze the horizontal placement of the circles in both configurations.
Puzzle 2 Code
To arrive at the solution, assess the horizontal distances (x-axis) between the circles. Sum those distances for the final answer.
Calculation: 1 + 2 + 2 + 1 + 2 + 2 + 2 = 12
Solution Code: 12
Calculation: 1 + 2 + 2 + 1 + 2 + 2 + 2 = 12
Solution Code: 12
Red Temple Puzzle 3 Solution
The third puzzle shifts focus to lines within symbols and the hints offered by nearby buttons. The chalk drawing assists in determining what I should be counting.
Puzzle 3 Hints
- Hint 1: Closely observe the buttons for any anomalies.
- Hint 2: The chalk drawing indicates a value of 2; find which feature appears twice in that representation.
- Hint 3: I assume symmetry in the second figure as I work out my answer.
Puzzle 3 Code
The solution hinges on counting the intersecting lines in both figures. Accounting for the second figure’s symmetry yields a total of 16, calculated as 8 × 2.
Solution Code: 616 (6 and 16)
Solution Code: 616 (6 and 16)
Red Temple Puzzle 4 Solution
The fourth puzzle consists of four figures and four corresponding buttons. Understanding the numbers concealed within the designs, rather than counting individual lines, is crucial.
Puzzle 4 Hints
- Hint 1: Compare the four figures to spot their similarities and differences; some may look familiar.
- Hint 2: With four figures and buttons, think about whether each represents a single digit of the final code.
Puzzle 4 Code
Each figure hides an embedded number inside a square. Identify those numbers in order to form the complete combination.
Solution Code: 5297
Solution Code: 5297
Red Temple Puzzle 5 Solution
The fifth puzzle requires comparing column pairs of symbols, applying specific logic operations to derive their line segments rather than interpreting them as full numbers.
Puzzle 5 Hints
- Hint 1: Analyze the three columns and buttons, each column likely contributes one digit to the combination.
- Hint 2: Draw the symbols side by side, noting their matching and differing segments for clarity.
- Hint 3: Use a logic gate to extract the resulting numerals from the symbols.
Puzzle 5 Code
Apply the XOR logic operation to each symbol pair. Retain only the line segments that appear in one symbol but not both; this approach provides the combination.
Solution Code: 357
Applying this rule to all three columns reveals the combination.
Solution Code: 357
Red Temple Puzzle 6 Solution
This puzzle seems tricky at first since part of the mural is missing. Fortunately, I can solve it using a method I’ve previously encountered.
Puzzle 6 Hints
- Hint 1: Don’t worry about finding the missing section to finish this puzzle.
- Hint 2: This puzzle follows the same principle as an earlier one, only with some information missing.
Puzzle 6 Code
I tackle this puzzle similarly to Puzzle 4. Each figure includes a hidden number within a square, so I look for those numbers even with some information obscured.
Solution Code: 64
Solution Code: 64
Red Temple Puzzle 7 Solution
The seventh puzzle necessitates a thorough examination of the wall where multiple number symbols might overlap. As always, clues from highlighted lines and buttons aid in reaching an answer.
Puzzle 7 Hints
- Hint 1: Shine a light on the wall first to reveal extra information.
- Hint 2: Consider which number symbols can fit inside the highlighted figure.
- Hint 3: The buttons indicate which digit corresponds to each marked line. For example, the top line will reveal the second digit.
- Hint 4: Try to combine the symbols to see if they recreate the original figure.
Puzzle 7 Code
Identify three number symbols that combine to reconstruct the original figure while utilizing highlighted lines. The sequence of those lines also determines the final combination’s order.
Solution Code: 523
Solution Code: 523
Red Temple Puzzle 8 Solution
For Puzzle 8, triangular cells are marked with various numbers of dots. To find the code, connect these dots to the line structures forming the game’s number symbols.
Puzzle 8 Hints
- Hint 1: Shine a light on the wall first to observe the figures.
- Hint 2: Explore why some triangles have one dot while others show two.
- Hint 3: The missing part of the third figure isn’t required for solving this puzzle.
- Hint 4: Experiment with number symbols inside the figures to see if the dots correspond accordingly.
Puzzle 8 Code
Count the dots to determine how many lines of a number symbol are adjacent to each triangular cell. Matching dot counts with lines helps pinpoint the three digits.
Solution Code: 097
Solution Code: 097
Red Temple Puzzle 9 Solution
The ninth puzzle differentiates itself as it requires integrating information from previous challenges rather than standing alone.
Puzzle 9 Hints
- Hint 1: Remember this puzzle deviates from the usual methods encountered throughout.
- Hint 2: Shine a light on the wall to uncover hints.
- Hint 3: Examine buttons closely for clues.
- Hint 4: Investigate the three small rectangles and their connection to earlier puzzles.
- Hint 5: Reference your map to find similar patterns.
- Hint 6: The three squares correspond to previously solved puzzles.
Puzzle 9 Code
The squares align with the answers to Puzzles 4, 5, and 6 from the second floor. Use the digits from those solutions in the order specified to finalize the code.
Solution Code: 9374
Solution Code: 9374